Hi,
In this post, we will see together “How to install Veeam ONE Server 9.5”.
What is Veeam ONE ?
Veeam ONE is a product included in Veeam’s “Availability Suite” program. It provides an overall view, in real time, of the VMware or Hyper-v infrastructure. Veeam ONE is also available for free, but with limited functionality.
Below are some of its features:
- Real-time monitoring and alerts 24/7
- More than 200 predefined alerts
- More than 100 predefined reports
- Tools for evaluating the infrastructure for backup
- Veeam Backup & Replication 9.5 Reports
- Chargeback and Billing Features for Virtual and Backup Infrastructures (New in Veeam ONE 9.5)
- Advanced deployment scenarios for large enterprises (New in Veeam ONE 9.5)
- Veeam Cloud Connect Monitoring and Reporting Features
- Integrity and Performance Dashboards
- Performance and Configuration Reviews for VMware vSphere and Microsoft Hyper-V
- Advanced Capacity Planning with scenario analysis and resource reservations
- Configuration tracking for your virtual and backup infrastructures
- Fully customizable reporting and documentation

How to install Veeam ONE Server 9.5 ?
In order to have a certain amount of informations from your VMware or Hyper-V infrastructure, you must install Veeam ONE Server, which will act as a data collector.
During this installation, the Veeam ONE Server executable will install, in addition, 2 modules:
– Veeam ONE Business View
– Veeam ONE Reporter
Download and extract ISO
You can download Veeam Availability Suite that include Veeam Backup & Replication + Veeam ONE Server here

After download, mount or extract ISO file and execute Setup.exe

Install it NOW !
Select Veeam ONE server 9.5 Update 1

Accept terms …

If you have a license key, you can add it at this moment

Select “Advanced” for custom install

Pick what feature you want and where you want to install it

Enter a service account that have the rights to connect at database

Select your SQL Server name. In my case, i use an AlwaysOn SQL Server with “Windows authentication credentials of service account”

Select by default…

I’ve forced D: drive

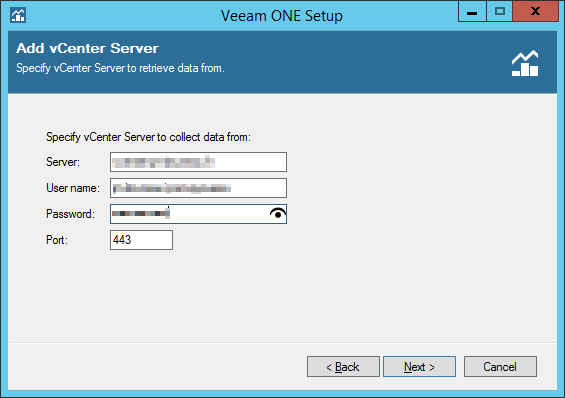
Select your environment, in my case i’ve select VMware vCenter Server

Add your vcenter name, for exemple vcenter.vdays.net, the user account that can connect to the vcenter (I advise you to use a service account), and the password !
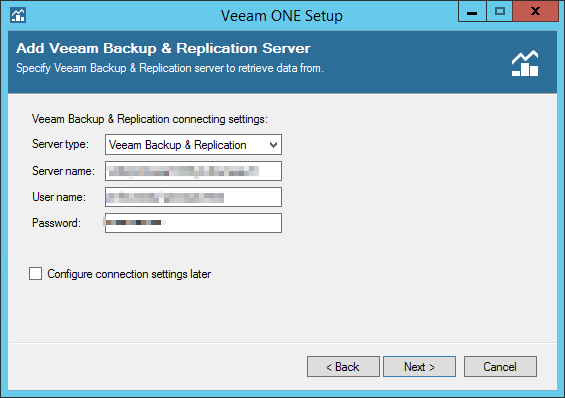
If you use Veeam Backup & Replication, you can connect VeeamONE to it !
Select your type of deployment

This is the end, your have a summary of your configuration


Now you can see 2 new icons on your desktop : 
Thank’s to read me, do not hesitate to comment or to ask me any questions about this article
Hi ! I’m Maxime. Founder and independant author of vDays.net. I have worked in service IT since 6 years ago, after a 5 years’ internship. Via this blog, I would like share and discuss with you on new technologies, especially on virtualization and VMware. If you want to know more about me, check out my “about me” page or follow me on Twitter and LinkedIn
