“PowerCLI 6.5.1 has been released and in this release we have made some big changes to the way you install and keep up to date with PowerCLI!
As of PowerCLI 6.5.1, you no longer have a MSI file to download and install. You can now install directly from the PowerShell Gallery! This update streamlines the install process in multiple ways and allows module based features which PowerShell users will be used to from other PowerShell based additions.” VMware
You will have understood in this introduction, VMware simplified the installation of its tools. Now, you can install it with 2 Powershell command lines!
Let’s go to see that?
Online Installation
In this post, we will see online installation via PowerShell Gallery.
- Check if you have access to the PowerShell gallery
|
1 |
Find-Module -Name VMware.PowerCLI |

- Now we can install the module with “Install-Module” powershell command
|
1 |
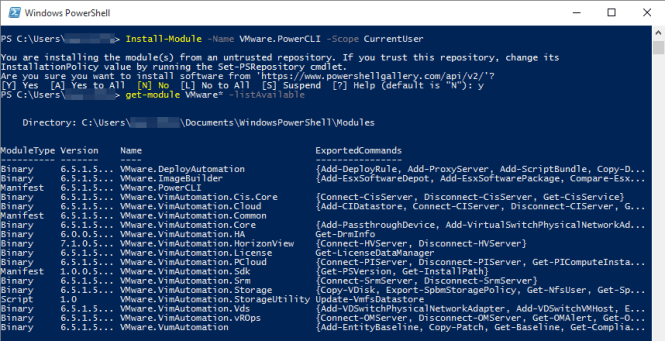
Install-Module -Name VMware.PowerCLI -Scope CurrentUser |

- After installation, you can check that new modules were be installed
|
1 |
Get-module VMware* -ListAvailable |
- Finally, you can now import yor new module same as another module in Powershell
|
1 |
Import-Module -Name VMware.PowerCLI |

Create a desktop shortcut
- Right click on your desktop for example > New > Shortcut
- Choose where you want to create your shortcut
- Add this informations :
|
1 2 3 4 5 |
Target: C:\Windows\System32\WindowsPowerShell\v1.0\powershell.exe -noe -c "Import-Module VMware.PowerCLI" Start In: C:\ Shortcut Key: None Run: Normal Window Comment: Launch VMware PowerCLI |

- Click on your shortcut !

Bonus ! Add PowerCLI icon
You can download icon on icon-png.com
- Right click on your shortcut > Properties
- Select “Change Icon” in the “Shortcut” tab

For more information and for the Offline installation, go to the VMware site
Hi ! I’m Maxime. Founder and independant author of vDays.net. I have worked in service IT since 6 years ago, after a 5 years’ internship. Via this blog, I would like share and discuss with you on new technologies, especially on virtualization and VMware. If you want to know more about me, check out my “about me” page or follow me on Twitter and LinkedIn

Pingback: [TUTO] - Veeam : Supprimer les snapshots temporaires de Veeam - vDays.net